fabricologist

fabricologist

Monday, December 30, 2013

Let's Start at the Very Beginning

A very good place to start. I have that song in my head from the Sound of Music. Anyway, today I am going to start my new series about my quilting journey and how I got from there to here. A couple of years ago, after I discovered the quilty blogging world, I decided to write an essay of sorts, about my quilting experience from the beginning. I wanted to document my quilts with words so I could show where I began and where I am now. I am going to share that here with you. I will still of course post more recent things here as well. So here we begin with the first installment.


Quilt by Quilt… A Quilter’s Journey  
By Charlotte Maxwell

 I have known how to sew since I was a young girl.  My grandmother taught me to sew buttons onto scraps of fabric so that I could handle a needle and thread.  I learned to tie a knot; a very large knot.  When I was about 10 years old, my other grandmother, who had been a professional seamstress for a time, helped me to make a pink, pleated skirt for a doll I had at the time.  I remember that skirt vividly.  It had a waistband and she taught me how to do an almost invisible hemstitch.  It was sewn on her Singer Featherweight.  I remember being so proud of that.

My mother and grandmother made lots of clothes for the girls in our family.  They also did sewing for the home; drapes and curtains and slipcovers for furniture.  It was what many women did in the 50’s and 60’s to save money.  I watched them.  A lot.

 I’m not sure when I started sewing in earnest.  I was required to take home economics when I was 12 and in the 7th grade.  There were two or three sewing units that year, and I enjoyed it enough to take another year in 8th grade.

Some time after that, I began sewing at home.  I could now read a pattern and follow it.  I made a baby bib for a friend’s child.  I made a halter-top for myself, and a swimsuit.  I only sewed with cotton for the most part.  Other fabrics scared me and I never thought to ask for help.

My mother would buy fabric or give me money to buy fabric to make clothes for my sisters and myself.  I made shorts and tops and a couple of pretty fancy dresses.  I started saving fabric scraps at about that time.  I thought that maybe some day I would make a patchwork quilt with the saved scraps.  I don’t really know where that idea came from.  We had no quilts in our home that I remember.

My very first quilt was started in about 1977.  I took some of the scraps and cut squares, with scissors and a cardboard pattern and began stitching them together by hand.  I didn’t live at home anymore, so I had no access to a machine.  I also did a few larger squares that had appliqué on them of plants and flowers that I had in my apartment.  They were done by trial and error, as I had no one to teach me the skills.  I didn’t get very far and I put it all away.

In 1981 when I was pregnant with my first child I pulled it all out again and finished it in a small size.  It was probably about 36 inches square.  I don’t remember what I used for the batting.  It was tied, though.  That first effort ended up in the bottom of the playpen for quite a few years, through two children.  I did not attempt any more quilts for a while, but I did keep sewing clothing and saving scraps.

I sewed lots of clothes for my girls when they were young.  I enjoyed it and I had a friend with whom I sewed.  Our kids were all about the same ages and I would take my machine to her house and set up on her kitchen table with her and sew.  By this time I had my grandmother’s old Singer featherweight for my own.  She had Alzheimer’s and couldn’t use it any longer.  My mother gave it to me.

My friend Linda and I would hit up Hancock’s and buy as much inexpensive fabric as we could afford.  We had a couple of patterns for shorts and tops and we made them over and over to outfit the kids for the summer.

In about 1990 when we were living in Dallas, I bought a Kenmore sewing machine, which I thought was the best thing ever.  It could zigzag and do buttonholes and a stretch stitch.  Since I was still sewing garments, this was appropriate for me.  I still had the Singer, but it didn’t see much action.

After I got the new machine, I saw an ad for a quilting kit to make a log cabin wreath quilt to hang on the wall.  Never being one to spend money on a kit with directions, I bought some fabric and squinting at that small picture, I made one on my own.  I thought it needed to be hand quilted; was there any other way to make an authentic quilt?  So I built a small square frame with my husband’s help, and stretched it onto it and away I stitched.  I guess it’s called the stab and stitch method.  I didn’t have any training in quilting yet.

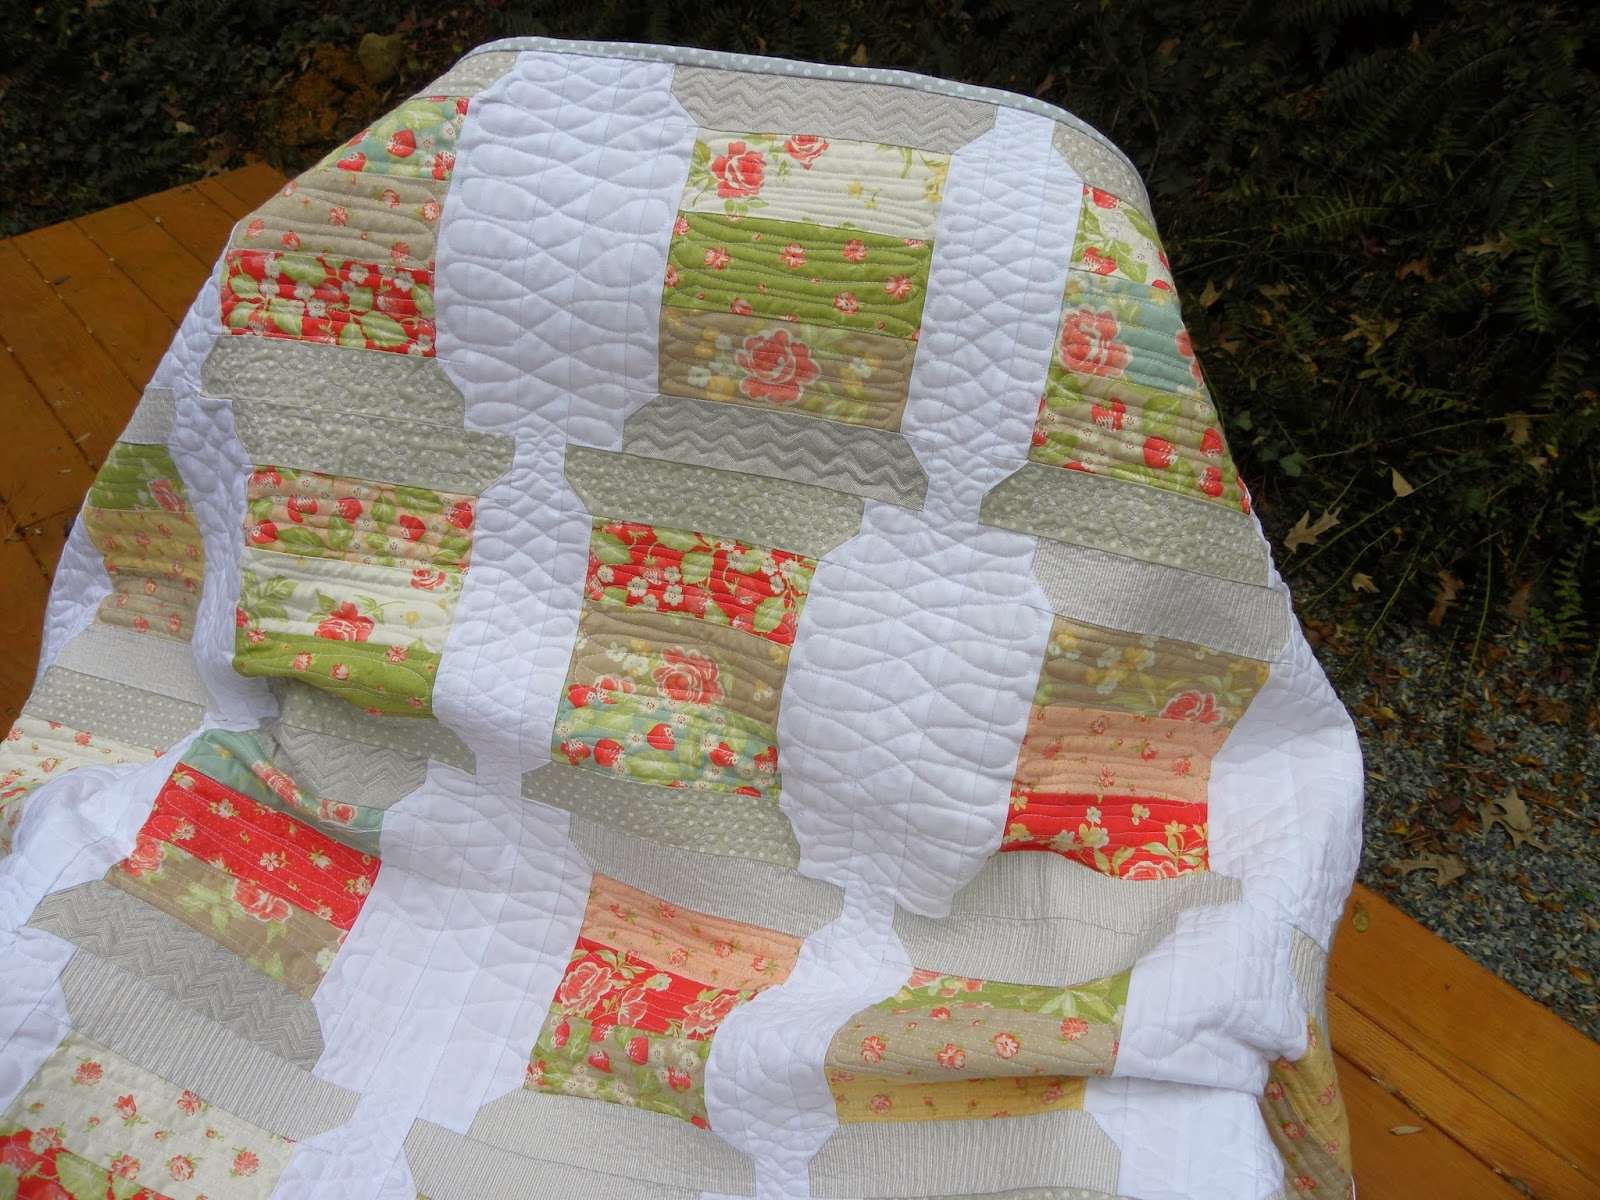
I don’t remember how long it took me to finish it; at least a year or so until it was done and off the frame.  By then we had moved to Florida.  I don't have any photos of the first quilt from the playpen days, but here is the second quilt.

 This little quilt is only 30 inches square and all the fabric was bought at my local Hancock fabrics in Dallas. It has very little actual quilting on it, is backed with unbleached muslin and has never been washed. It spent lots of years hanging on the walls in our homes.
 The binding is single fold, and each side is sewn on as a single piece since I didn't know how to turn corners back then. Each square is quilted with a fleur de lis in the center of the square.

I hope you enjoy my journey. I will be back soon for another installment.

Saturday, December 21, 2013

What My Spools Quilt Taught Me

I love this quilt, so much more now that it is done, as is so often the case. It took me a long time to finish it, and there was a lot of learning along the way, so that is what I want to share here today. If you are like me, you often admire quilts made by others and think "I would love to make one of those." But seldom do I act on that thought for a couple of reasons. I can't always find the same fabrics or the pattern is complex and I am not one who does complex very often. Or, more likely, I just want to admire it...a lot...but not really actually make it. The Spools pattern grabbed me. The biggest reason I went ahead and bought it, other than the fact that I do love so many of Camille's patterns, is the wobbly way the spools are stacked. It is very different from most spool quilts.

 I bought the pattern on March 17th of this year. Funny, when I checked on that, I thought it had been much longer ago. I didn't have the fabrics Camille used, but what I did have was a fat eighth bundle of Strawberry Fields by Fig Tree. I bought the fat eighth, the only bundle of that size I have ever purchased, because I just needed to have more than a charm pack of those soft, beautiful designs.
 I spent one session cutting out all the pieces for this quilt. I have never done that before. I tend to cut and sew and cut and sew as I go. I was determined to do this in a different way. I bought a plastic project storage container and kept all the parts in there as I made the blocks over time.  I think it was late summer or early fall when I finally had this quilt top finished.  So far, so good. I was pleased with the look of my work.  Now, to quilt it.
 My first thought was to shortcut it and do a loopy doodle all over it and have it done.  But having recently finished quilting a special quilt for my sister which involved 16 hours of quilting (I kept track) I started to think about doing more for my spools.
 I used the patterns on the grey spool ends to inspire me and quilted lines, zigzags and a scribble on the dotted ones, filling them in pretty densely. For the spools themselves, I quilted an oval loop around from top to bottom to imitate the way thread is wound around a spool. It is less dense than the grey areas.
 For the white background, I chose to quilt a figure 8 that ran from top to bottom. I found that I could expand and contract it pretty easily as the white area expanded and contracted.  When it was done, the lesson from the quilting became "less dense quilting comes to the foreground, while more dense quilting recedes to the background". I am sure this is not a new concept, but I didn't think of it before I quilted this.
 Another lesson I learned is about thread. While I was making this quilt and quilting it, I was short on funds and ran low on white thread. I have been sewing with Aurifil for a couple of years now, almost exclusively. It works well with my Bernina. While I did not go buy a cheap thread, I did buy a less expensive thread. I used some Mettler which I had and some Gutermann that I got at Joann with a coupon.
 All threads are not created equal and all machines do not sew well with all threads.  My stitches are uneven and I fought with my machine a bit, but I did manage to finish this quilt. I learned my lesson. If it's worth doing, it's worth doing right, including the supplies.
 The last lesson is that washing and drying, which shrinks and provides the crinkles we love so much does help to equalize the dense and not so dense quilting.  It does look better now.
I love this quilt and I am so glad I followed my heart and made it. I hope to keep the lessons learned in the front of my mind when next I start a project, but this I know about me: I am a hard headed person and I will need to re-learn some of these lessons next time I decide to take a shortcut.  Have a great day and I will talk to you soon.

Tuesday, December 17, 2013

A New Series

I have been wanting to write a series on the blog for some time now. About 2 years ago I began an essay of sorts, about my quilting experiences.  I titled it Quilt by Quilt: A Quilter's Journey.  I intended for it to be a document that told of the quilts I made and how I made them and when I made them.  The document lives on my computer and I update it occasionally to add new quilts to the list of things I have done. My original intent was to go back later and flesh in the details about the quilts. There have been so many I did not want to forget about. Some were gifted and I no longer have access to them and the pictures of them are old and not very good.
Every quilt has a story behind it and so I am going to start telling those stories here. I hope you will stop by and read about my quilting journey. I hope to post frequently, as I have so many quilts to share with you. I think I am close to 100 quilts, but my count is not accurate.  You will see how my style has changed along with the modern quilt movement and the fabrics have changed as well.  I can't wait to get started.  Hope I see you here too.
Talk to you soon.

Monday, December 16, 2013

Christmas is Coming

It's just next week, as a matter of fact. So much still to do. If life was a little less chaotic, I would have more posts and more to show you. It is hard to find sewing time right now. On top of working 40 hours a week, I am babysitting one day a week after work, which cuts out any sewing time that day and one of my days off each of these last two weeks is for Christmas shopping with my hubby.  And yesterday was our Cookie Sunday for the grandsons.

 I buy ingredients when they are on sale for about 2 months ahead of time. We need to bake lots of cookies and biscotti.
And I dress the part for this one day, with my Christmas clothes and baking apron. Just waiting for my kiddos to show up.  It was a good day. The older boys got to help with many parts, and then just enjoyed being together and playing. Little B, at 18 months loved having so many grown ups to pay attention to him, and tried to keep up with the big kids.

In other news, I was able to finish my first ever holiday table runner.  I have wanted to make one, but never have gotten around to it until now.

 I had purchased two of the prints from Hip Holiday when it first came out, not knowing what I would do with it, but knowing I would make something once inspiration struck.
 I used the triangle part of my Tri-Recs tool to cut the triangles for the runner, adding a green that I had and a pale blue from the Noteworthy line. It looks grey here, sorry.
 I quilted it with a spiraling triangle in each one, using different color threads. I used dark pink on the blue, pale blue in the green and a lime green in the big print diamonds.

The back is half cars and trees and half mod trees, so it can be used both ways. This one went home with the oldest daughter. She can't have a table cloth right now, because Little B will pull it off the table.  Next year I will make one for the next daughter and one for myself. I still have lots of Christmas fabric to use up.  Have a great week and talk to you soon.

Tuesday, December 3, 2013

Thanksgiving Done, Now on to Christmas...

 First, you need Christmas trees. Here is my modern Christmas Tree quilt from the QAL brought to you by Christa, of Christa Quilts. It's not too late to make one and they are pretty quick to make, even when you go crazy like me and piece all the background.  Let's just say it didn't start out that way, but it evolved.
 Happily, the back is all one piece, so no piecing was needed there. This is wall hanging size in case you were wondering.
 One more shot of the trees and the quilting, which is straight lines in each row of trees, alternating between horizontal and vertical for each row.
 An early gift for me! I really needed a new one of these. I rarely carry a purse any more, so my wristlet got worn and dirty. Well, it was mostly white, so no surprise there.  This time, a dirt hiding color...brown, with a bit of red.
 It holds my iPhone and my i.d. and debit card. I can stuff a couple of dollars in there too and that's all I need to carry with me. I clip  my keys to the strap and off I go.
    One more shot of the back...isn't it lovely? Pattern is by Caroline of Trillium Designs.
 And a new pillow for the couch, not that it needs one, but I wanted to make a Christmas pillow this year. I got the idea for this one on Ellison Lane during a Christmas themed blog hop. I think all the links and tutorials are still available there if you are interested.I have one more pillow form to use and have a plan for it.
 The back is an envelope closure using this cute fabric I bought last year from Joann's on line.
 Here is a close up. I love all the little windows with Christmas scenes in them.
 This is the scene out my back window. I made a bunch of these little red birds a couple of years ago and I love hanging them on the tree, in the windows and just about everywhere. I have 18-20 of them. Yes, I got carried away.
So get your minions and get stitching! There is still lots of time to whip up some Christmas stuff. These are bath mitts for my grandsons, made from a tutorial by Amy Friend at During Quiet Time.