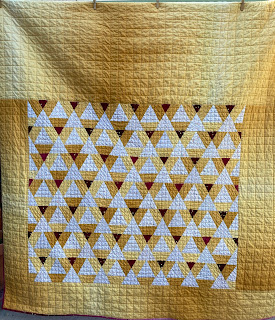
This is the full story of the Lavender Quilt from Jodi Godfrey's book, The Seedling Quilts. When the book first came out, I was intrigued by the beautiful EPP quilts. I had done hexagons, but was itching to try something else now. I saw a photo of the Lavender quilt on line and that hooked me. There was jus something about that quilt that I had to have it. That doesn't happen to me often. So first, I bought the book. Blogger has re-ordered the photos, so bear with me here.
This is the finished quilt top. I loved the colors Jodi used. I decided to use an Ombre Confetti Metallic for the small triangles. I felt it would give me the color I wanted, but with some subtle variations due to the ombre effect. I then ordered about 4 yards of Honey color V and Co. Ombre fabric for the half hexies and the border. I thought it would be more interesting. I had a picture in my head, which doesn't always translate to reality. When the top was finished, it didn't look like my vision, exactly. And it was too big by 12 inches. After some searching and requesting help on Instagram, and finally emailing back and forth with Jodi, I discovered the errata that the quilt was supposed to finish at 64 inches square, not 54 as in the book. The extra over that was my error. I trimmed the quilt top to 64 inches square before quilting.I had ordered 3 yards of this Carrie Bloomston fabric and it was just perfect for the back...except it wasn't quite enough. So I inserted this dark purple stripe and then it fit. With the quilting I wanted to do, I needed 2-3 inches extra for the shrinking that would happen.
I quilted the entire quilt in a grid, one and a half inches apart to start. Then, I went back to the EPP triangle section and quilted again, this time half the distance between the first lines. It was mostly 3/4 inches spaced, but I really just eyeballed it. I am happy with the imperfect results.
After a trip through the washer and dryer to crinkle it, the texture is amazing. The crinkle of it makes the quilt. The imperfections disappear, and the ombre borders have a movement that they didn't before.
When I did the binding, which I decided to do totally by machine, I added my label and the year.
A brief bit about the binding: as I was getting close to done with the quilting, I began to consider what to bind with. I went back through my scraps to find what was left of all the fabrics. I found some strips of the fabric I used for the small triangles, a bit of the same style of a similar color, and a bit of the gold Ombre Confetti Metallic left from something else. So all together, I had enough for the binding. And I love the whole thing!!
For some of the quilting I used this guide to help with my one and a half inch lines.
This is the quilting in the border, before it got washed and dried to crinkly goodness.
A fun fact, this little triangle still had it's paper in it. I noticed it when I quilted over it. I decided to leave it because what else could I really do at that point? It softened considerably in the wash.
One last shot of the entire quilt. I highly recommend this book. There are twelve beautiful quilts waiting to be made in it. Thank you for stopping by today, and for reading this long post. I hope to see you soon.


4 comments:
Great to see your finish. It has turned out so well with all your quilting. Lots of work and a lovely finish.
You did a beautiful job on this one! I'm with you on the crinkle crush -- I don't feel like a quilt is really finished until it comes out of the wash, slightly shrunken, so much softer, with that bumpy cuddly texture to it! You rocked the machine stitched binding and your labels are super cute, too.
Thank you Karen. I always appreciate your support.
Thanks Rebecca. I always love the crinkle out of the dryer. My labels are from Dutch Label Co.
Post a Comment